guides
Create a Tailscale Subnet Router for IPv6
A step-by-step guide to routing an Excloud IPv6 address through Tailscale, with browser screenshots for route approval.
Why use IPv6 instead of IPv4?
A single Tailscale network, called a tailnet, can contain subnet routers from multiple cloud accounts. The problem with IPv4 is that independently created cloud networks often reuse the same private range:
Production account: 10.0.0.0/16
Staging account:    10.0.0.0/16
Analytics account:  10.0.0.0/16
After these networks join one tailnet, an address such as 10.0.0.25 is ambiguous. The destination does not identify its cloud account. Advertising the same route from several Tailscale subnet routers normally means that the routers provide redundant paths to the same subnet; it does not distinguish unrelated networks that happen to reuse an IPv4 range.
Assigned IPv6 Global Unicast prefixes solve this routing conflict because they are globally unique and do not overlap:
Production router -> 2001:db8:100::/64
Staging router    -> 2001:db8:200::/64
Analytics router  -> 2001:db8:300::/64
Each destination now selects exactly one cloud route. You can connect all the accounts through subnet routers in a single tailnet, keep one identity and access-control layer, and avoid IPv4 renumbering or NAT-based address translation.
                         one Tailscale tailnet

Developer laptop ─────┬──────────────┬──────────────┐
                      │              │              │
                prod router    staging router  analytics router
                      │              │              │
             unique IPv6 /64  unique IPv6 /64 unique IPv6 /64
This property applies to assigned Global Unicast IPv6 space—not every IPv6 address. Do not advertise link-local addresses under fe80::/10. Tailscale’s own node addresses under fd7a:115c:a1e0::/48 are Unique Local Addresses for devices inside the tailnet, not native cloud subnets.
IPv6 uniqueness does not make a workload public by itself. Reachability still depends on Excloud routing, security groups, host firewalls, Tailscale route approval, and tailnet access policy.
What this guide sets up
This guide turns an Ubuntu VM into a Tailscale subnet router. Devices in your tailnet can then reach a native Excloud IPv6 address without installing Tailscale on the target VM.
The example screenshots use 2001:db8:100::/64, a documentation-only prefix. Replace it with your assigned Excloud IPv6 address or prefix.
Advertise a route, not a bare IP. Use
/128to expose one IPv6 host, for example2001:db8:100::25/128. Use the assigned subnet length, commonly/64, only when the router should provide access to the entire subnet. Do not advertise the router’s Tailscale IPv6 address underfd7a:115c:a1e0::/48.
What you need
- An Excloud Ubuntu VM to use as the subnet router.
- Network reachability from that VM to the target IPv6 address.
- SSH access to the router.
- Permission to add a machine and approve routes in your Tailscale tailnet.
- The target VM’s native Excloud IPv6 address or subnet prefix.
The router and target can be the same VM for testing, but a subnet router is normally used to reach other machines that do not run Tailscale.
1. Create or choose the router VM
Create an Ubuntu VM in the same Excloud subnet as the target workloads. The managed DEFAULT subnet provides IPv4 and IPv6 connectivity. Follow Deploying Ubuntu if you need a new VM.
SSH to the router and confirm that it has a native global IPv6 address:
ip -6 address show scope global
ip -6 route
Test the target before installing Tailscale:
ping -6 -c 3 <target-ipv6>Do not continue until this works. Tailscale cannot repair missing Excloud routes, security-group rules, or host-firewall rules between the router and the target.
2. Install and authenticate Tailscale
On the router, install Tailscale using the official Linux installer:
curl -fsSL https://tailscale.com/install.sh | sh
sudo tailscale up --hostname=tailscale-prod-subnet-router
The command prints an authentication URL. Open it in a browser, sign in to the correct Tailscale account, and approve the new machine.
For unattended production routers, use a narrowly scoped tagged auth key instead of enrolling the machine as a person’s device. Protect the key as a secret.
Confirm that the router is connected:
tailscale status
tailscale ip -4
tailscale ip -6
The address printed by tailscale ip -6 is the router’s Tailscale ULA. It is not the native Excloud IPv6 route to advertise.
3. Enable IPv6 forwarding
Enable packet forwarding permanently:
echo 'net.ipv6.conf.all.forwarding = 1' \
  | sudo tee /etc/sysctl.d/99-tailscale.conf
sudo sysctl -p /etc/sysctl.d/99-tailscale.conf
Verify that the result is 1:
sysctl net.ipv6.conf.all.forwardingKeep the router’s forwarding firewall deny-by-default and allow only the traffic needed between tailscale0 and the target subnet. Enabling forwarding is not an access policy.
4. Advertise the IPv6 route
Choose one of these route sizes.
One target IPv6 address
Append /128 to the target’s native Excloud IPv6 address:
sudo tailscale set --advertise-routes=<target-ipv6>/128Example:
sudo tailscale set --advertise-routes=2001:db8:100::25/128The entire IPv6 subnet
Advertise the prefix only when tailnet users should be able to route to every permitted host in that subnet:
sudo tailscale set --advertise-routes=2001:db8:100::/64Use the prefix actually assigned to the subnet. Do not guess the prefix length, use a link-local fe80::/10 route, or advertise ::/0; use a Tailscale exit node for default internet routing.
If this router already advertises routes, --advertise-routes replaces the complete advertised-route list. Include every route that should remain:
sudo tailscale set \
  --advertise-routes=10.0.0.0/16,2001:db8:100::/64
5. Find the subnet router in the browser
Open the Tailscale Machines page, select Filters, and choose Property → Subnet. You can also search for property:subnet.
The machine should be connected and display a Subnets badge. Select its name to open the machine details.
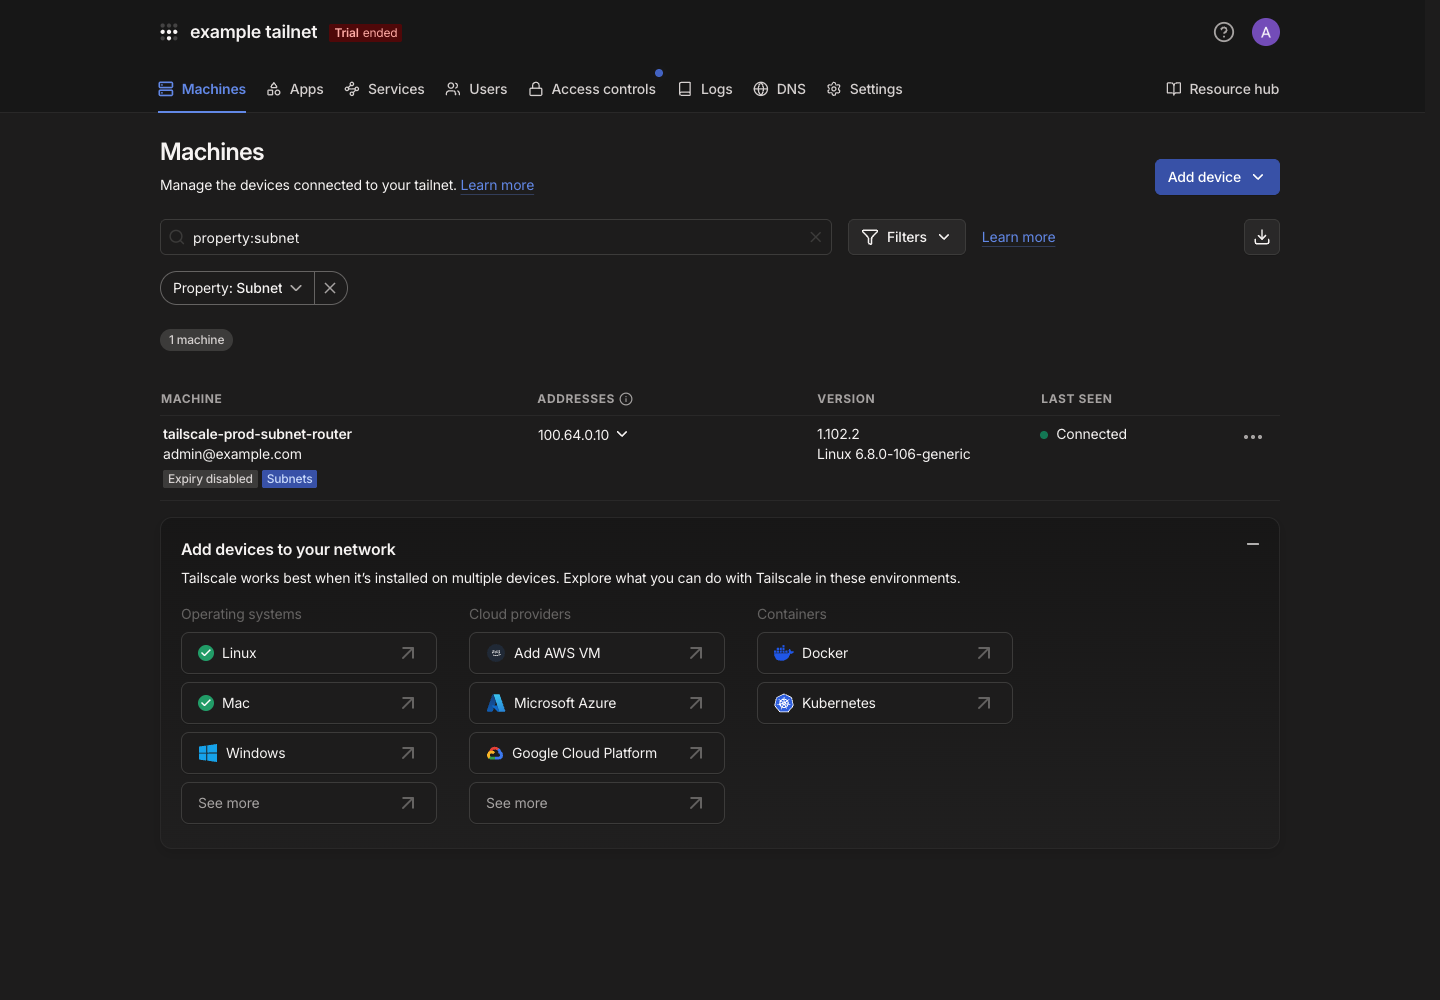
If the machine does not appear, run tailscale status on the router and check that you authenticated it into the same tailnet shown in the browser.
6. Review the advertised route
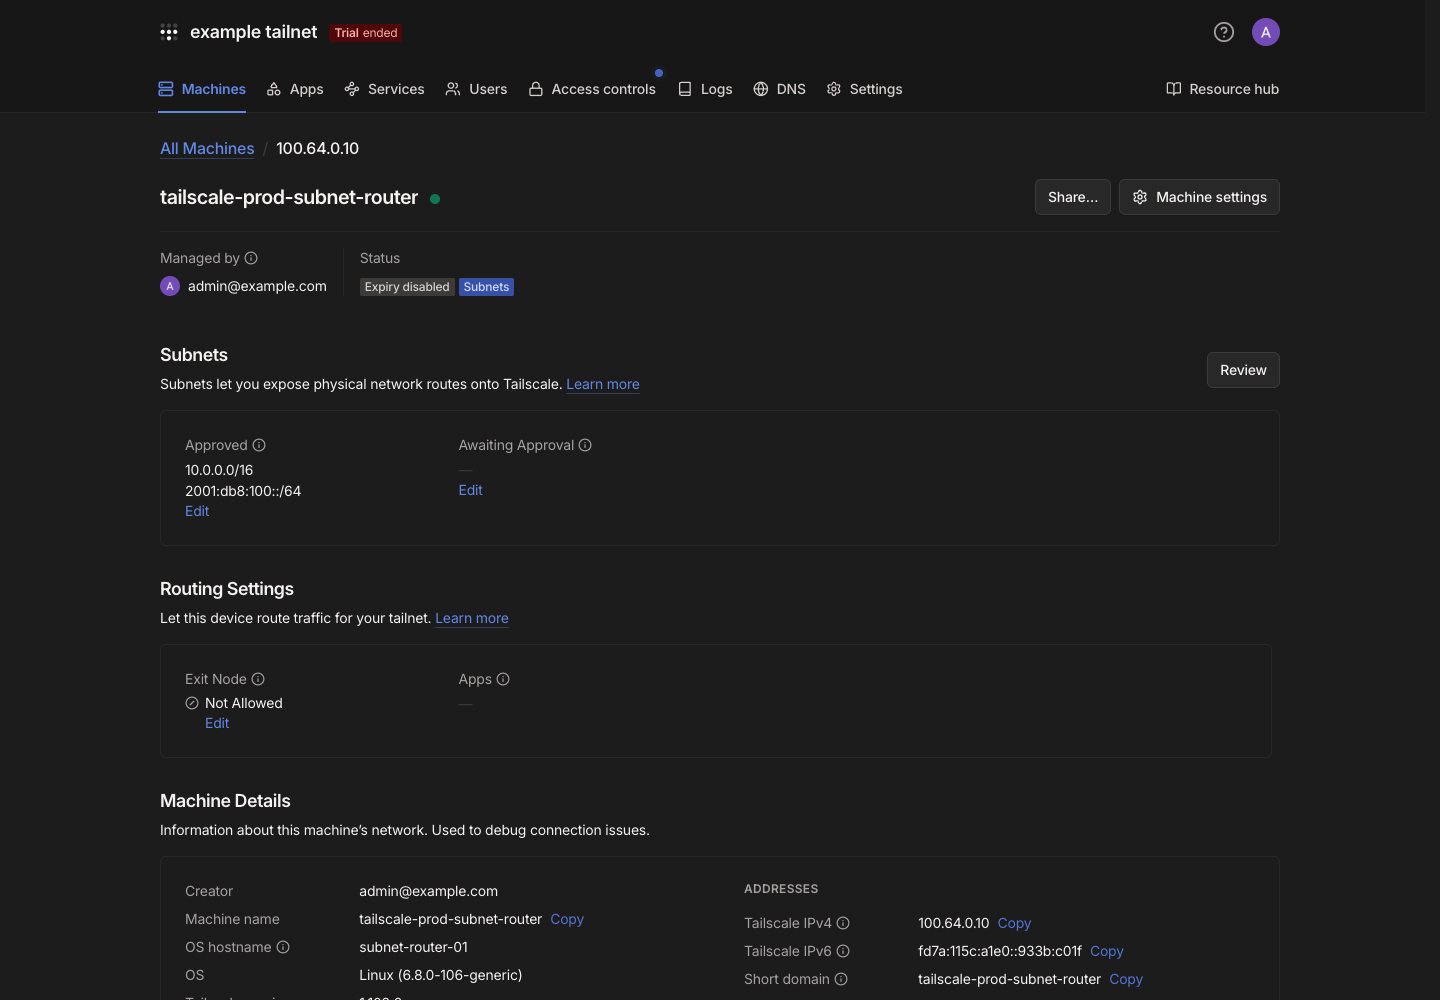
On the machine details page, find Subnets. A newly advertised route appears under Awaiting Approval. Select Review or Edit.
The screenshot below shows the final approved state. Your route remains unavailable to clients until it is approved.
7. Approve the IPv6 route
In Edit route settings:
- Select the checkbox beside the IPv6
/128address or subnet prefix. - Leave Use as exit node off; a subnet route is not an exit node.
- Select Save.
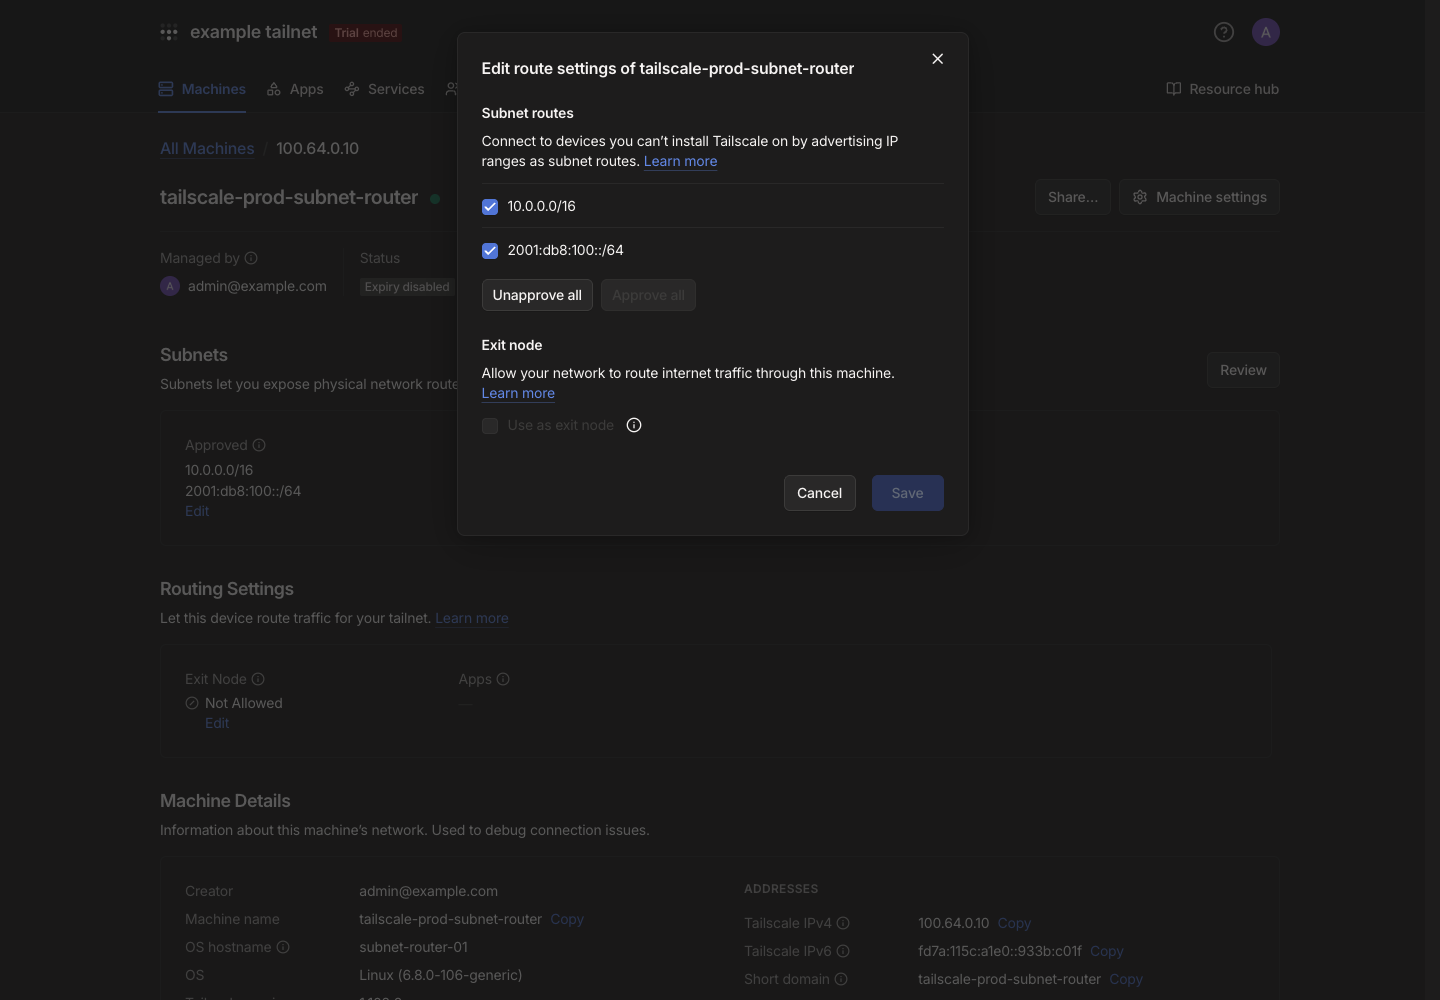
The route should now appear under Approved. Route approval makes the route available, but Tailscale access controls still decide who may use it.
You can skip manual browser approval when a carefully scoped autoApprovers policy already permits the router to advertise this route.
8. Restrict access
In the Tailscale admin console, open Access controls and grant only the required users, devices, and ports access to the advertised destination.
This example allows the operations group to reach SSH on one routed IPv6 host:
{
  "groups": {
    "group:operations": ["[email protected]"]
  },
  "grants": [
    {
      "src": ["group:operations"],
      "dst": ["2001:db8:100::25/128"],
      "ip": ["tcp:22"]
    }
  ]
}
Validate the example against the current Tailscale grants syntax before applying it. Route approval and access grants are separate controls; both must be correct.
Tailscale subnet routers use SNAT by default. The target normally sees the router’s native Excloud IPv6 address as the source, so configure the target’s Excloud security group and host firewall to allow the required ports from that router—not from all of ::/0.
9. Accept and test the route
Android, iOS, macOS, and Windows normally accept subnet routes automatically. On a Linux client, enable them:
sudo tailscale set --accept-routesFrom an authorized tailnet client, test the router and then the target:
tailscale ping tailscale-prod-subnet-router
ping -6 <target-ipv6>
ssh <user>@<target-ipv6>
Use brackets around an IPv6 literal in a URL:
curl -g -6 'https://[<target-ipv6>]:8443/health'For applications, prefer an internal DNS name with an AAAA record over an IPv6 literal.
Add another cloud account
Repeat the steps with one router in each account and advertise a different native IPv6 route from each router:
production router -> 2001:db8:100::/64
staging router    -> 2001:db8:200::/64
analytics router  -> 2001:db8:300::/64
Globally unique, non-overlapping IPv6 prefixes let one tailnet route to several cloud accounts even when their private IPv4 ranges overlap. Never use the same advertised prefix for unrelated networks. Advertising the same prefix from two routers means both routers reach the same subnet and is intended for high availability.
Troubleshooting
The route does not appear in the browser
Run the advertisement again and inspect the daemon state:
sudo tailscale set --advertise-routes=<ipv6-route>
tailscale status
sudo journalctl -u tailscaled --since '10 minutes ago'
Confirm that <ipv6-route> includes /128 or the correct subnet prefix length.
The route is approved but the target is unreachable
Check each layer in order:
- The router can
ping -6or connect to the target without Tailscale. net.ipv6.conf.all.forwardingis1.- The host firewall permits forwarding between
tailscale0and the target interface. - The target security group allows the service port from the router’s native IPv6 address.
- The Tailscale grant allows the client and destination.
- A Linux client has
--accept-routesenabled. - The service listens on IPv6, not only on
127.0.0.1or an IPv4 address.
The wrong IPv6 address was advertised
Replace the advertised-route list with the correct value:
sudo tailscale set --advertise-routes=<correct-ipv6-route>Then return to Machines → router → Subnets → Edit, approve the correct route, and unapprove the old route.
Security notes
- Tailscale encryption ends at the subnet router. Keep application TLS enabled between the router and sensitive targets.
- Do not open target IPv6 ingress broadly to
::/0merely because Tailscale controls the overlay path. - Disable key expiry or use tagged devices for unattended routers, and monitor router health.
- For critical subnets, run two routers in the same network and advertise the same route from both.
- Install Tailscale directly on a workload when possible for end-to-end device identity and encryption.